8.2.4 Light Cycle Arena and Staging Pit
After stepping through the port, a cutscene shows the Kernel's assistant waiting for you on the other end, saying that the boss would like a word with you. After an interrogation, the Kernel decides you will be de-rezzed. But a mysterious observer intervenes, suggesting you be placed on the game grid instead. The Kernel agrees.

|
Since you have entered a new computer system, you will need to re-install your subroutines in the new slot configuration.
|

|
Here is a suggested configuration. To be honest, what subroutines you have installed doesn't matter at all on this level, but it will later. Press the F1 key to exit this screen.
|

Before you proceed, notice that your weapons are gone! They were taken when you were captured. Oh well, you don't need them right now, anyway. The ICPs won't attack you here.
Sometimes a build note appears on the column to the left. Grab it if it's there, then walk all the way to the other side of the room.
1/5 1.7.3 1.7.3
|

|
Talk to the program Wolfgang.
|

|
He will give you the Rod Primitive you need, to do Light Cycle racing.
|

Turn around, and walk until you see the staircase on your right. Turn to face it.
If the build note wasn't on the column, sometimes it's at the top of the stairs. If it's not there either, climb the stairs anyway, and turn left.
|

The last place it could be, is in this nook beside another flight of stairs.
Turn right and climb the stairs now.
|

|
After climbing the stairs, turn around. Go right, and walk all the way to the other side of the room.
|

|
Here you'll find a program waiting to talk with you, and a couple of archive bins. Head for the bins.
|

|
Check the lower bin, first. Download both permissions and the e-mail.
|

|
The upper bin still requires a permission you don't have, so ignore it for the time being.
|

|
Talk to the program Elmer, now. He'll open the portal to a light cycle training grid.
|

|
Elmer will walk over to the nearby console, and the door in front of you will open. Quick save your game (F5 key), and enter the portal.
|

Now you'll rezz up in your light cycle, on a training grid.
Listen to and follow the instructions about cycle and camera control. The semicolon ; key locks and unlocks the camera in place behind you, and the apostrophe ' changes between 1st and 3rd-person perspective. I suggest locking the camera in place at first, so you only have to worry about your driving.
|

Practice maneuvering well enough, so that you can aim for and grab the power-ups when they appear.
Here's the shield. It allows you to break through the trail of any light cycle, including your own. There's no time limit on how long it lasts, it only disappears when you use it to break through a trail.
|

|
After you've picked up the shield, try activating it with the weapon fire key.
|

Once you've activated it and observed its effect, try finding the other power-up.
If you activate a shield, you can pick up another one and carry it around with you. That way, if you use up the first one, you have another one ready to be used.
|

|
Here's the Turbo Boost. Like its name implies, it gives you a huge speed boost, on demand.
|

|
After you've picked it up, you can again see the icon showing it's in your inventory, like the shield was before.
|

|
After you've picked up the boost, give it a try.
|

Give the speed zones a try, as well.
Here's the slow zone, in red. It slows down your cycle, dramatically. You'll generally want to avoid these.
|

|
And here's the fast zone, in green. These should also be avoided, except at certain times when you want to outrun an opponent. You travel faster here, than when you use the boost! These speed up your cycle so much, it makes control very difficult! Also, there are often power-ups strategically placed in fast zones with nearby obstacles . . . forcing you to take a chance, in order to grab them.
|

|
When the announcement about the Exit Ring is finally made, head for it so you can move on to the next stage.
|

On the next grid, you'll be facing two opponents. You can actually leave this grid without facing them at all, but it's best you practice against them. There are two simple strategies you can use to try and defeat all light cycle opponents.
The first is to avoid them as much as possible. Let your opponents de-rezz each other, or make a mistake and crash. Unfortunately, that won't work here. The grid is wide open, so there's no chance of either happening.
So try using the maneuver shown in the screenshot. Approach an opponent head on. When he's close, turn toward the nearest grid wall. Don't wait until the last second, give yourself some breathing room. Most of the time, the opponent will head the same way you did, and be racing parallel beside you.
Wait until you're almost at the wall, then turn away from the opponent. Again, don't wait until the last second. Give yourself some room away from the wall. Your opponent should have stayed with you, not far behind. Now do the zig-zag motion as shown in the screenshot, closing the gap toward the wall. Be careful not to hit the wall, though! Then zig-zag away from the wall.
|

If you can pull off this zig-zag maneuver, then most of the time the opponent will crash into your trail even if they have a shield. The shield only breaks through a small portion of the trail, and doesn't remove the whole thing.
However, if your opponent is almost beside you like in this screenshot, then don't do the zig-zag! Turn away (in this case, left) in the same direction twice, to do a kind of U-Turn. Get away from that opponent, and try crashing him again later.
|

|
The way I beat the current opponents, was to take on the left one in the dark blue cycle, first. Head straight for him, and then turn left toward the wall, if he doesn't do it before you. In this case, he did.
|

|
Turn left, then left again when fairly close to the wall. Now do the zig-zag.
|

After de-rezzing the first cycle, take on the light blue one. As you can see, I'm attempting the same zig-zag maneuver, but this time away from a wall. It still has a good chance of working even now, so I'm using it!
Don't worry if you de-rezz, you have infinite lives if you keeping saying Yes when the game asks if you want to retry. There's no point penalty for de-rezzing, so don't worry about lowering your score, either.
|
|
After you've defeated the second opponent, head for the exit ring once more.
|

You'll return through the same portal, back to the staging pit. Completing the training gains you five build points.
Head to the left, and walk down that passage.
1.7.8
|

At this stage of the level, there are always two build notes to be found.
The first build note can sometimes be found between these pillars.
2/5 1.8.0
|

Turn around. Sometimes, a build note can be found here, in this security locker alcove.
Continue moving toward the other side of the room now, and head down the far flight of stairs.
|

|
Turn left. Sometimes a build note will be in the nearby nook. Other times, you see it on the upper level in the corner, where the arrow indicates.
|

Turn right, and head to the end of the column to the left of the next flight of stairs. Sometimes a build note will appear here.
3/5 1.8.2
|

Go down the stairs to the bottom floor. Look for a program either sitting on the bench to the left, or wandering around and sometimes leaning against the columns.
Talk to Ringo. (The name could be different, the program names in this level change from time to time.) Since the next race has a different stream to enter, he will show you where to go. Follow him.
|

Ringo will stop in front of the portal to the data stream. If you talk to him again, he'll say this is the entrance to the next Light Cycle grid.
After you've finished listening, quick save your game, and head into the portal.
|

Once you've rezzed into your cycle, accelerate to full speed. Notice that there are now obstacles in this arena.
Head for the shield power-up, off in the distance to the left. Be facing the arena wall when you pick it up.
|

|
Grab the shield and activate it before Sk8 does, in the Gold cycle.
|

Wait a moment, then turn left, and left again. Leave some space between you and the wall, like shown in the screenshot.
Now do the zig-zag maneuvers again, like before. You should de-rezz Sk8 quite easily.
|

Use the same tactic on Cody. He should be easy to handle, with there only being one opponent on the grid now. Just be careful not to crash into the obstacles.
After he's been eliminated, head for the exit ring in the center of the grid.
|

After completing the second race, you receive five build points.
1.8.7
|

|
Approach the two ICPs nearby, and listen to sbchost. (The name could be different.) He's telling the other ICP to hurry and make up his mind who to bet on, before the next race starts. The other ICP can't decide.
|

|
Talk to spooler. (The name could be different.) He'll turn around and notice you, then ask who you think will win the next race.
|

At this point, there are two correct choices.
You can choose answer number 4, and go around asking all four game bots for their pick on who will win the next race. Their responses will be somewhat inconclusive, but the general feeling is that the Blue racer has the best chance of winning.
Or you can simply pick number 2 and get things over with, now that you know who will win. 
You'll end up listening to the race, and when Blue wins . . . not only is spooler one happy program, but you've earned five extra build points.
1.9.2
|

|
After spooler walks off, follow him, and talk to him again. He'll congratulate you, and thank you for helping him win a bet.
|

Head to the other side of the room. You'll find another ICP hanging around, where Elmer was before.
In the corner, you'll sometimes find a build note. Grab it, before talking to the ICP.
4/5 1.9.4
|

|
Talk to rttask. (The name could be different.) He'll say that he's been following your progress in the races, and he thinks you have a lot of potential. Then he gives you a permission to a security locker, and tells you to take what's inside it.
|

|
Before moving on, check to see if a build note appears in front of the door, if you didn't just grab one on the right.
|

|
Also check to the left, in the other corner, to see if a build note is there.
|

|
Now turn around, and return to the archive bin with the e-mail. The permission you received, just so happens to allow you access to the bin. You can now download the e-mail.
|

|
It's time to use that permission. Head to the right, and enter the nearest security locker area. We're going to check every locker, to see which one the permission opens.
|

|
Check all the lockers. If the permission ring shows a missing red permission, that means you can't open it.
|

|
Head back outside, and turn right. Walk to the next locker alcove.
|

|
This alcove only has one locker to check.
|

|
Head back out, and move to the other side of the room. Check the large locker area now.
|

|
There are three lockers here. If you find the correct locker, all permissions required will be blue.
|

After you've opened the locker, inside you'll find the rod primitive for a Super Cycle! Grab it to upgrade your cycle, and gain five build points in the process.
1.9.9
|

|
Head back outside, and go to the right. Quick save your game, and enter the portal to the light cycle grid.
|

|
The Super Cycle should give you a great advantage over your opponents, making it easier to beat them from now on.
|

Accelerate to top speed. The camera is unlocked by default, so you should be able to look to your right. There's a shield power-up on a speed zone. Head for it.
Make sure to beat Sim in the Red cycle to the power-up, and don't crash into him. When you're through the speed zone, turn right.
|

Sim will also try to grab the power-up. If you beat him, he'll crash into your trail most of the time. If not you can use the zig-zag maneuver.
Once past the speed zone and obstacles, turn right again.
|

At this point, it's up to you. You can take on both of the other two programs, or you can wait to see which one de-rezzes the other first and then take out the remaining program. Use the respawning shield power-ups to your advantage, whenever possible.
Once that's done, head for the exit ring.
|

After finishing the race, you earn five more build points, which means a new version milestone! Enter the System Memory screen, and distribute the attribute points between Energy, Weapon_Efficiency, and Health, in that order of preference. Give the most points to Energy.
Exit the system memory screen, and head to the left.
2.0.4
|

In the locker area, you'll sometimes find the final build note.
5/5 2.0.6
|

|
Turn around. The build note will sometimes be behind you, between these two pillars.
|

|
Turn left, and head to the end of this passage. The last place the build note could be, is here in the corner.
|

|
Head back the way you came. If you walk up to the data stream port, you'll see it's closed right now. You need to talk to a few programs first, before you can proceed.
|

|
Turn around and head down the stairs, to the bottom floor. Look for the program there, and talk to him. Jay will inform you that you're going to be up against light cycle champion Mercury, and your chances are slim to none of winning against her. (His name could be different.)
|

|
Head back up the stairs. Move to the other side of the room. Talk to Virginia. (Her name could be different.) She'll tell you the same thing, that Mercury can "run circles" around the competition, even though the cycles only go straight.
|

Return to the other side of the room. Talk to Oswald, twice. (His name could be different.) At first he'll congratulate you on your performance, but then he'll state that he changed his mind and doesn't think you have a chance. Nice guy.
Time to head through the port.
|

As it turns out, this stage is actually quite easy. You don't even have to take on any opponents. The goal is to just stay alive, and make your way across the grid, to the other end.
Accelerate to full speed. When you're almost halfway across the fast zone, turn left, before LAN in the Red cycle hits you head-on.
|

|
You can pick up the shield if you want, but it's not necessary. The reason we've taken this detour, is to avoid LAN and allow time for his trail to disappear.
|

|
Keep going until you almost reach the arena wall, then turn right. Continue until you almost reach the next arena wall.
|

|
Turn right again. Don't turn left and enter the first opening. Wait until you see the next opening, then turn left.
|

|
Head straight through this second opening, and cross the slow zone.
|

|
When you see the structure made up of beams, turn right, then left, and head through the opening where the arrow shows.
|
|
While under the structure, turn right. Don't bother with the shield. Turn left after you've passed it, and the wall behind it.
|

|
Just before the slow zone, turn right. You'll see Two-D approaching on the Yellow cycle. Don't worry about him.
|

|
Turn left where the arrow indicates, and cross the slow zone.
|

When you've crossed the slow zone, turn right.
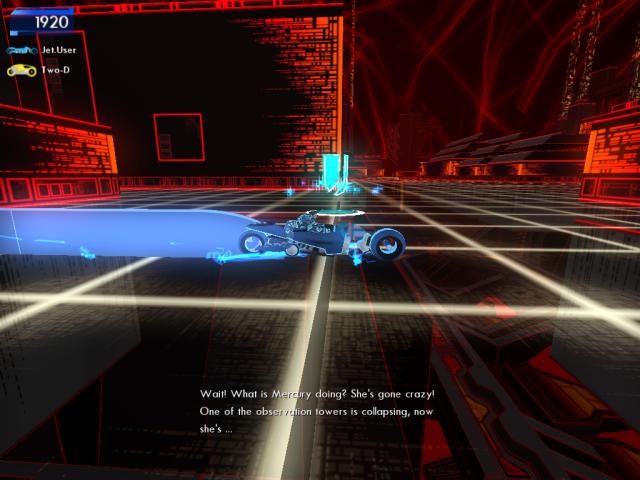
By this point, you should know why you're crossing the grid. Mercury has prepared a way for you to escape. Of course, she was the one who was responsible for averting your de-resolution, by putting you on the game grid.
|

|
After turning right, turn left where the arrow shows.
|

|
Now just keep going straight ahead, toward the "3" on the wall, in the background. Be careful not to hit the wall on the right, if you turned this way late.
|

|
Once you're out in the open, look for the broken structure toward the right in the distance. Turn right here.
|

|
Head for the exit ring, and make sure you'll travel up the center of the ramp created by the debris.
|

|
Jet will drive up the ramp and jump over the wall, out of the arena. You've escaped!
|
Final build version for this level: 2.0.6